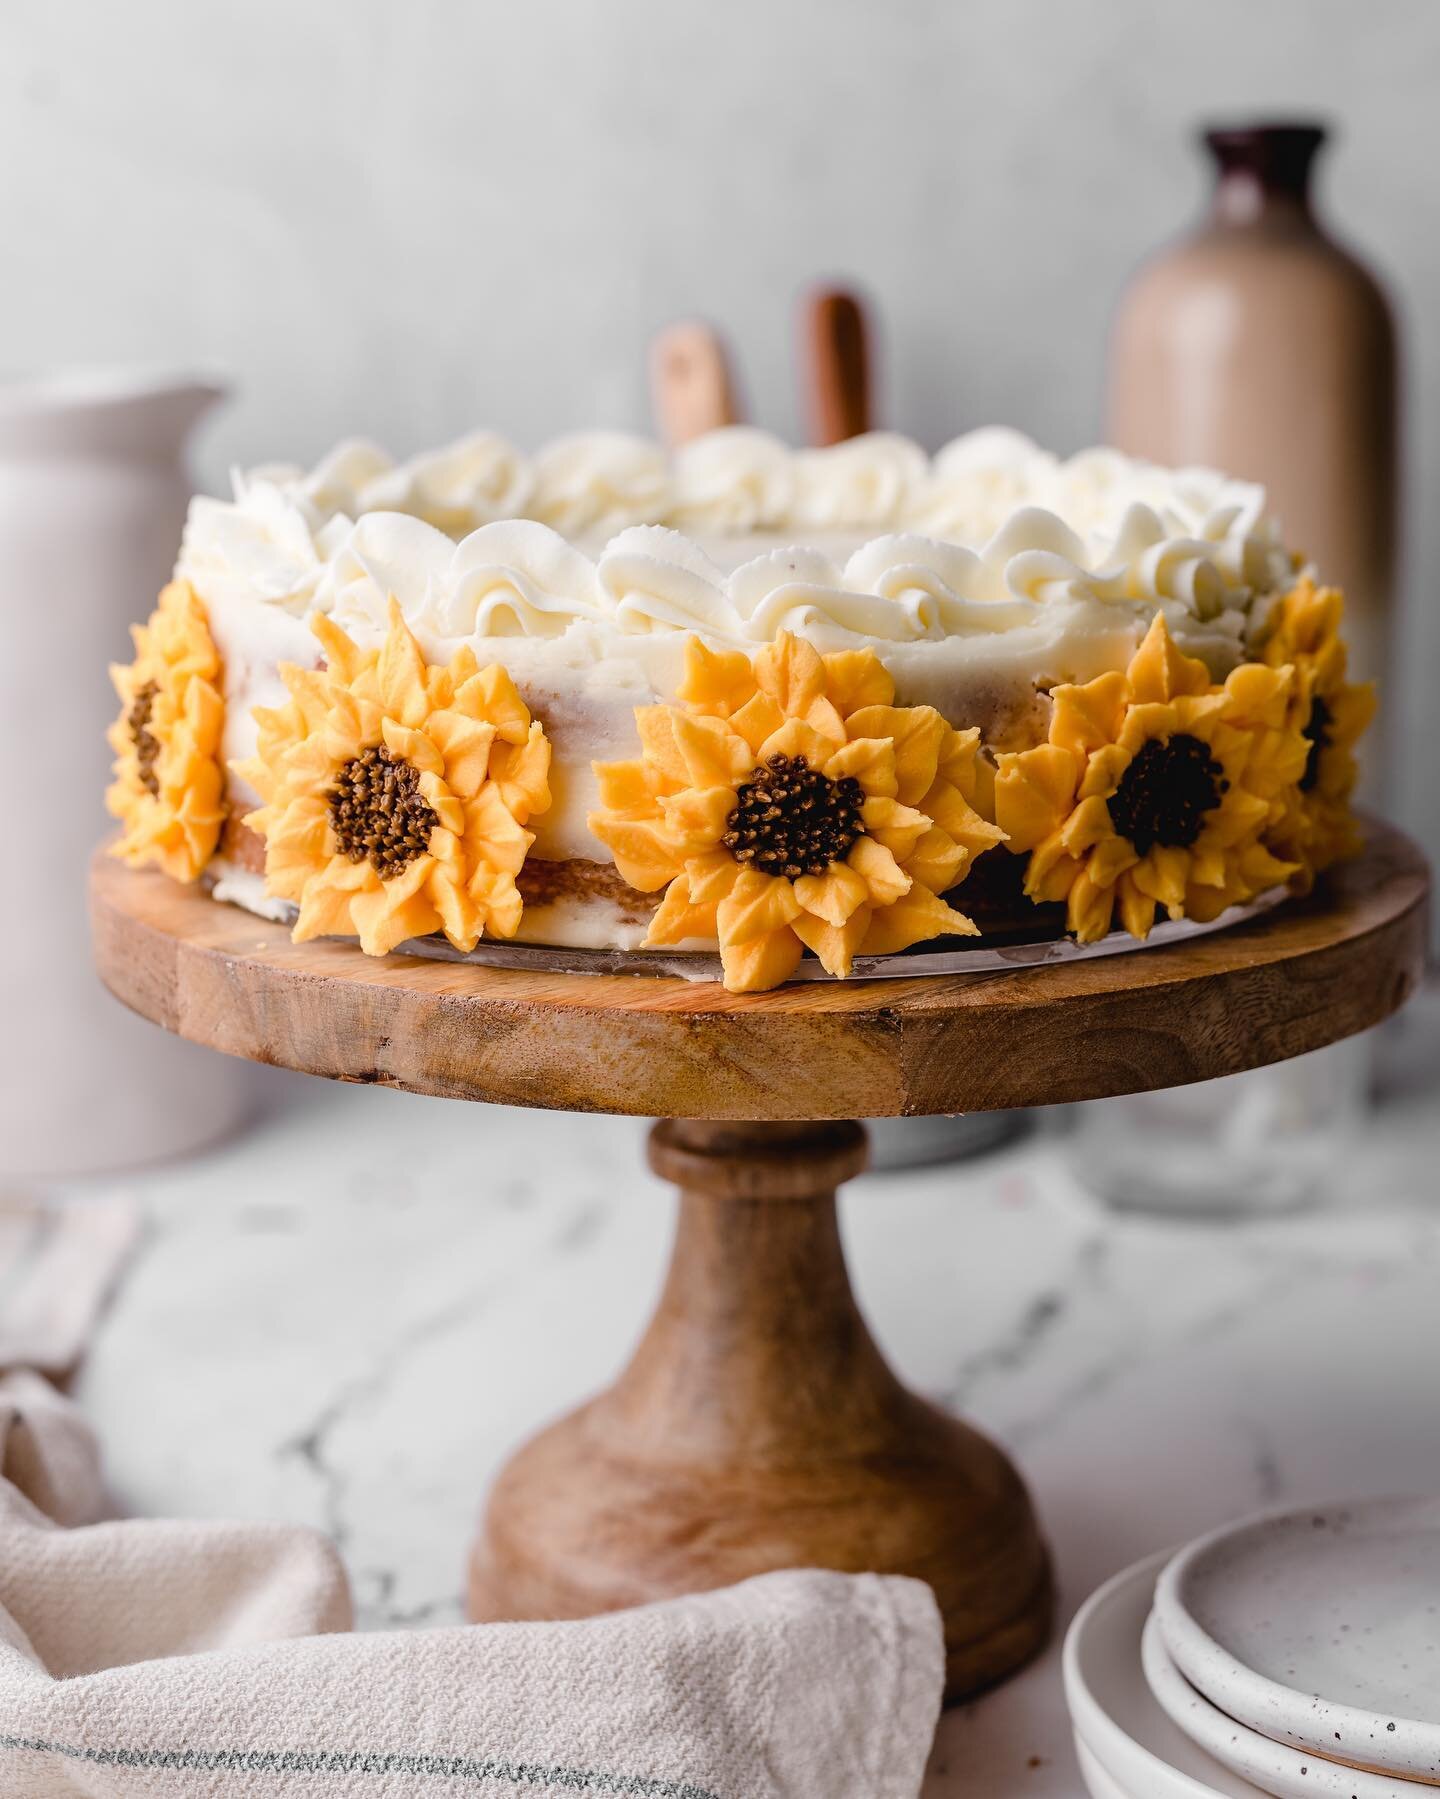
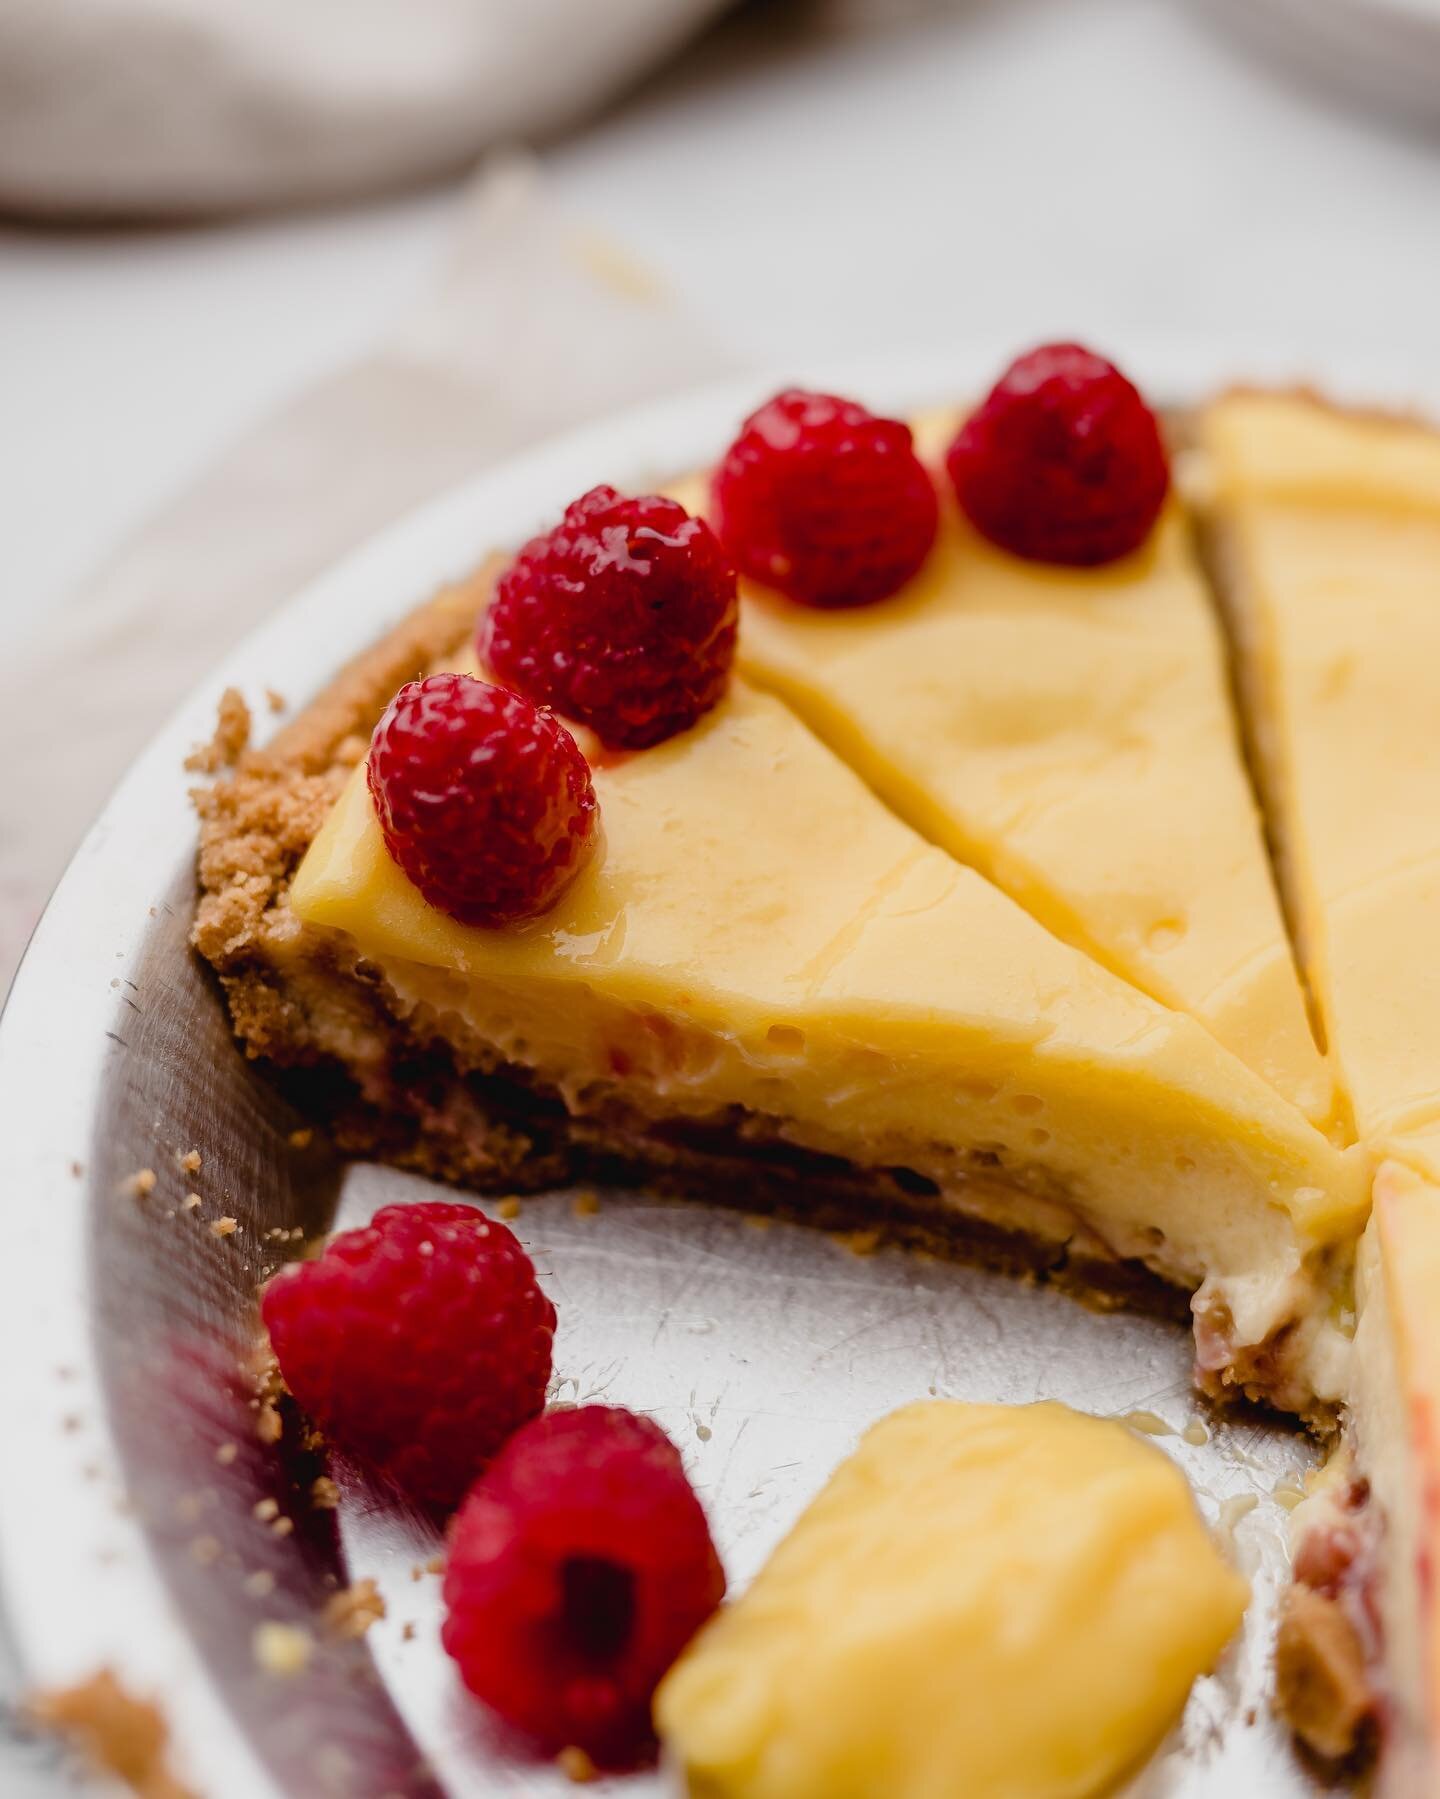
Triple Berry Lemon Swirl Cake
This cake has three layers of triple berry lemon swirl, and it’s all covered in a smooth and tangy berry cream cheese icing.
I have yet another summer recipe, and this time it’s a triple berry, fresh lemon, extravaganza. The idea for this cake stemmed from my Marble and Neapolitan Cake, as the techniques are very similar. The cake starts by using a single batter, and is then adapted to accommodate different flavors. This cake has no artificial ingredients or colors, as the purple hue comes from freeze dried berries, and the lemon flavor comes from fresh grated lemon zest and juice. Let’s dive right into all the helpful information needed to make this cake.

Ingredients and Equipment
As far as ingredients, most everything required are pantry staples, but there are a few ingredients that will likely require a stop at the grocery store, so plan accordingly.
Pantry Staples: Butter Granulated Sugar Eggs Vanilla All-Purpose Flour Baking Soda Salt
Other Items:
Triple Berry Freeze Dried Medley · * I buy this at Trader Joe’s. I love this product because not only is it delicious, but it’s also organic. If Trader Joe’s ends up discontinuing this product, or it isn’t available, a homemade freeze-dried berry mix can be used. Alternatively, use only freeze-dried strawberries for a Strawberry Lemonade Swirl Cake instead.
Whole Lemon · * Rather than using lemon extract or prepackaged lemon juice, use a whole fresh lemon. Only one lemon is needed.
Cake Flour · * I have spoken extensively on cake flour previously, saying that if baking regularly, one should familiarize themselves with cake flour. I love using a combination of cake flour and all-purpose flour in my cakes, as it creates the perfect texture. Cake flour can be found on the baking isle in most large grocery stores.
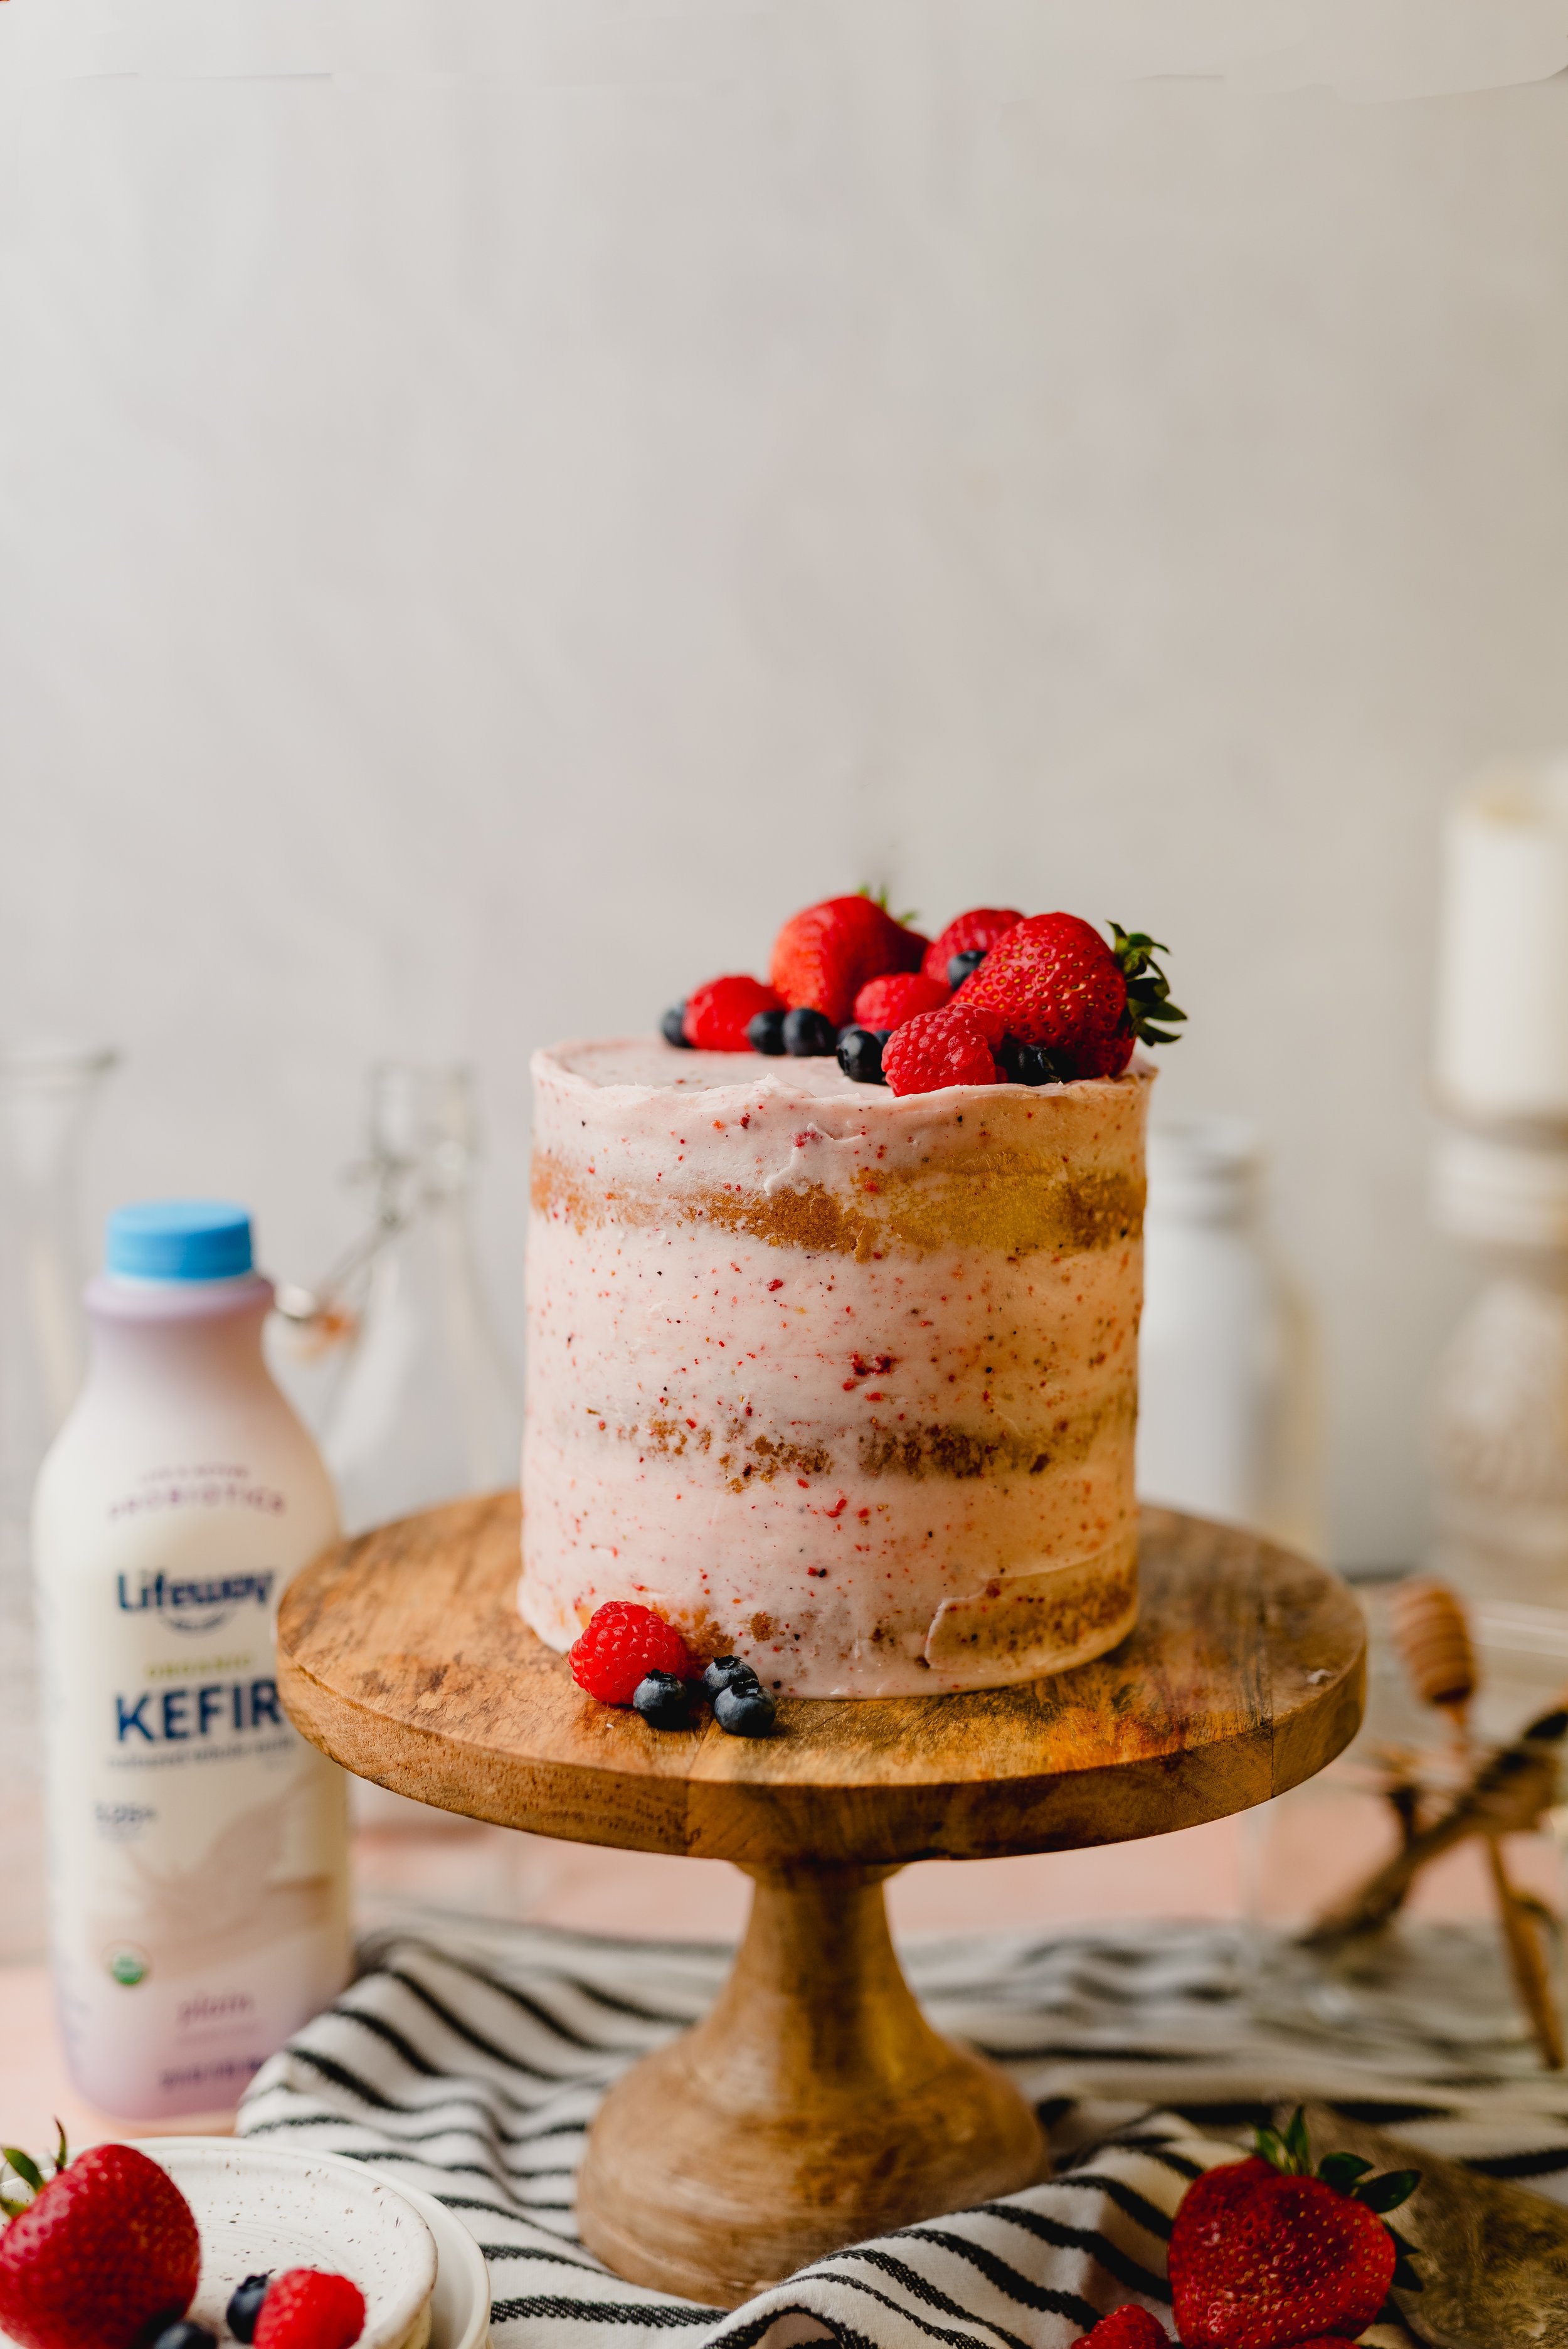
Kefir · * I love using Lifeway’s Plain Organic Whole Milk Kefir instead of buttermilk. It looks like this. Not only is kefir more readily available than full fat buttermilk, but it provides unparalleled texture and flavor in cakes.
In regards to equipment, I tested this cake using a handheld electric mixer and also my standing Kitchen Aid mixer; both cakes were delicious. To make this cake, I recommend using a couple long handled spatulas (since there are two flavors being made), a food processor to pulverize the freeze-dried berries, and a few medium sized mixing bowls Further, I recommend having three quality 6” cake pans.

Important Information About Fillings and Frostings
The cream cheese icing is easy to make. It’s my basic cream cheese icing recipe with the addition of freeze-dried berries. The berries create the most beautiful pink color and the flavor is wonderful. I also opted to add lemon curd in the cake layers. The curd can be made at home or purchased, but either way it’s a delicious addition.
These two ingredients separately are no issue, but putting them together within the cake can be challenging. Picture a cake slipping and sliding, and the lemon curd oozing out the sides onto the cake plate. How do we avoid this from happening?
Start with chilled cake layers. Once the cake is baked and cooled to room temperature, place the cakes--wrapped with saran wrap--into the fridge to completely cool. They can also be placed in the freezer. If planning to leave the cake layers in the freezer for a few days, first wrap in saran wrap and then with aluminum foil to prevent frostbite.
Next, make sure the lemon curd is chilled. If making a homemade lemon curd, this won’t be an issue as the curd sets in the fridge, but if buying at the store, make sure it’s placed in the fridge for several hours before using.
In case you’re wondering, the cream cheese icing doesn’t need to be chilled before stacking the cake, but if you’re feeling nervous, pop it in the fridge for a few minutes to firm it up a bit. Typically, using chilled cake layers and chilled lemon curd will be enough to prevent leakage.
To stack the cake, take a chilled cake layer and place it on a turntable; add an even layer of cream cheese icing. Next, using a piping bag, create a circle or a well that will hold the lemon curd. For reference, look here. Place this circle about a half inch to an inch away from the edge of the cake. Next, fill the area with chilled lemon curd, but don’t go crazy here as too much curd will spill over the sides of the dam created. Repeat this process for the remaining cake layers. Once the cake is stacked, DO NOT PUT ICING ON THE SIDES OF THE CAKE YET. Instead, place the cake in the fridge for 30 minutes to let everything firm up. After 30 minutes, decorate the cake as desired. I always opt for a semi-naked look as it’s my favorite, and doesn’t require a crumb coat with an additional chill time in the fridge.

Substitutions and Variations
If a swirled cake feels to complicated, try my Fresh Lemon Cake or my Strawberry Cupcakes. Both are summery and delicious.
For other cakes that use a similar technique, my Marbled Cake and Neapolitan cake can be found here and here.
Final Tip
The cake will take 20-25 minutes to bake. Telltale signs the cake is done include, the sides just starting pull away from the pan, and a slight browning of the cake layers. A toothpick is also a good indicator, but I recommend learning to look beyond the toothpick.
Triple Berry Lemon Swirl Cake

Ingredients
- 1 stick salted butter, room temperature
- 1 1/2 cups granulated sugar
- 2 tablespoons canola oil
- 3 large eggs, room temperature
- 1 1/2 teaspoons pure vanilla extract
- 1 cup all-purpose flour
- 1 cup cake flour
- 1 teaspoon baking powder
- 1/2 teaspoon baking soda
- 1/2 teaspoon salt
- 1/4 cup triple berry freeze dried strawberries, processed into a fine powder*
- 1 cup Lifeway Plain Whole Milk Kefir
- 1 tablespoon lemon zest
- 2 tablespoons fresh squeezed lemon juice
- 1 large egg
- 4 large egg yolks
- 1/2 cup granulated sugar
- 1/3 cup fresh lemon juice
- Zest of 1 small lemon
- 3 tablespoons butter, room temperature
- 1 stick salted butter, room temperature
- 8 ounce block cream cheese, room temperature
- 1/4 teaspoon vanilla
- 1/4 cup triple berry freeze dried strawberries, processed into a fine powder
- 3-4 cups powdered sugar, to taste
- Pinch of lemon zest
Instructions
- Preheat oven 350 degrees F. Generously butter and flour three 6" cake pans. To guarantee the cake won't stick, line the bottom of the greased cake pans with parchment paper rounds. Set aside.
- In a mixer, fitted with the paddle attachment, cream the butter and sugar on medium speed for 3 minutes. Drizzle the oil into the bowl on medium-low speed. Once incorporated, turn the mixer back to medium speed for another 2 minutes.
- Add eggs one at a time, briefly mixing batter on medium speed until smooth, scraping the bowl after each egg addition. Add the vanilla and briefly mix until combined. Distribute the batter evenly between two large bowls. Set aside.
- Into two medium bowls, using a fine mesh sieve, sift 1/2 cup all-purpose flour, 1/2 cup cake flour, 1/2 teaspoon baking powder, 1/4 teaspoon baking soda, and 1/4 teaspoon salt. Into one of these bowls, add 1/4 cup freeze dried berry powder. Spoon and level the flours for an accurate measurement.
- To complete the triple berry batter, into the first wet batter bowl, and using the dry ingredient bowl with the freeze dried strawberry powder, alternate the dry ingredients with 1/2 cup kefir. To do this, add a third of the dry ingredients into the mixing bowl on low speed. Immediately follow with half of the kefir, followed by another third of the dry ingredients and the second half of the kefir. Finish with the remaining dry ingredients.
- To complete the lemon batter, into the second wet batter bowl, and using the second dry ingredient bowl, alternate the dry ingredients with 1/2 cup kefir. To do this, add a third of the dry ingredients into the mixing bowl on low speed. Immediately follow with half of the kefir, followed by another third of the dry ingredients and the second half of the kefir. Finish with the remaining dry ingredients. Add lemon juice and zest into the batter and mix until just incorporated. Scrape the bowl, making sure any dry ingredients trapped at the bottom are brought to the top and briefly mix one more time.
- Alternating flavors, add a large dollop of each batter into the cake pans until no batter remains. Using a knife, carefully swirl the batter back and forth to give a marbling effect.
- Bake the cakes. Start assessing the cakes for doneness at 20 minutes. They could take up to 25 minutes or longer to bake, depending on the oven temperature. When a toothpick inserted comes out clean, the cake is done. Cool pans for 10 minutes, before running a knife around the edge of the pan, and turning out the cake. Place cake on wire rack to finish cooling. Once cake is cooled, cover with saran wrap and refrigerate for at least 1 hour. This step is optional, but makes icing the cake easier.
- PLEASE NOTE: This recipe yields about 1 cup of curd, which is more than needed for the cake filling. The rest can be stored up to a week in the refrigerator, and used for other baking projects. Or alternatively, a dollop of lemon curd can be placed on each piece of cake when served.
- Using a double boiler, whisk together the whole egg, egg yolks, sugar, lemon juice and zest. Cook over medium-low to medium heat, stirring constantly, until the ingredients have thickened.
- Once thickened, remove from heat, and press through a fine mesh sieve into a bowl, leaving behind the remnants of lemon zest, and any egg that may have cooked. Immediately stir in the softened butter.
- Cover with a piece of plastic wrap, pressed directly on the surface of the curd to prevent a skin from forming. Place in the refrigerator to cool for 1 hour before filling the cake.
- With an electric mixer fitted with the paddle attachment, mix the cream cheese and butter on medium speed until there are no lumps, and the consistency is smooth. Add vanilla and freeze dried berry and mix until smooth.
- Add sifted powdered sugar to the bowl, 1 cup at a time, mixing first on low speed to prevent splashing, then turning the mixer to medium-low until it's incorporated. Repeat process with remaining 2 cups of powdered sugar. Add the lemon zest into the bowl and briefly mix one more time to complete the icing.
- Place one layer of cake on a clean turn table or cake board with a small dollop of icing underneath. This works as a glue, helping prevent the cake layers from sliding around while icing. Place a dollop of icing on top of the first cake layer, and spread evenly with a small offset spatula or knife. Using a pastry bag, create a ring of cream cheese frosting around the edge of the first cake layer. Carefully place a few spoonfuls of chilled lemon curd into the center of the well, and gently spread to the edge of the cream cheese ring. The cream cheese ring acts as a guard to keep the lemon curd from oozing out of the cake. Place the second cake layer on top of icing and repeat process. Once the third and final layer has been set, place another dollop of icing onto the top of the cake, smoothing evenly, letting excess icing drop to the side of the cake.
- With the rest of the icing, using an offset spatula, put a even layer of icing around the entire cake, with a back and forth motion.
- Using a bench scraper (also known as cake smoother) with your dominant hand, hold it steady against the cake, and keeping it as straight and steady as possible, slowly move the turn table with the other hand, while not moving the scraper. As excess icing builds on the scraper, place it back into the mixing bowl, and continue smoothing the cake with a clean scraper. This cake is intended to be semi-naked, so as you scrape the excess icing off the cake, bits of the cake underneath will be exposed. See blog pictures for reference.
- While smoothing the sides, a lip of icing will form around the top of the cake. Using an offset spatula, gently sweep away the lip with a motion toward the center of the cake. Rotate the cake, and sweep until the lip has been removed, and top of the cake is smooth. Any leftover icing can be used to decorate the cake with a beaded boarder, or another decoration of choice. Store cake in the refrigerator until 2 hours before serving.
Notes
*see blog post for more information
You May Like These…